Earth Science Laboratory
EAS 100-51 : Lab 7
TOPOGRAPHIC MAPS
Objectives:
-
To learn how to read a map, i.e., to locate points, measure distances
and use scales.
-
To learn how to read contours and topographic expressions.
-
To construct profiles and contouring from elevation points.
Introduction:
Maps are a representation of a part of the
earth's surface as if one were looking down from a considerable height.
They are drawn to scale, meaning that any two points have
the same relative position on the map as they do on the ground. There
are many types of maps, but probably the most useful are topographic
maps, which are invaluable, provided they have been carefully made.
In the construction of highways, pipelines, railroads and canals, good
topographic maps are essential for indoor planning. A geologist must
have accurate maps for plotting field data, although aerial photos are
now used extensively. The ability to read a topographic maps keeps
a traveler on his desired route, whether it is by airplane or just a hike
in the country.
The making of maps necessitates the accurate measurement
of both vertical distances (elevation above sea level) and horizontal distances.
The exact elevations of fixed points are found by precise surveying; each
point is called a bench mark (B.M.) and is marked by a round
brass plate. A triangulation station is a point where the horizontal
distance and relative position from other triangulation stations is accurately
established by surveying methods. When a map is made, all other points
in the area are located in relation to these accurately surveyed points.
A bench mark at the CPR station on Richmond Street is described as follows:
"Front
or north stone foundation wall, 10 feet west of doorway of general waiting
room, and 2 feet 7 inches below brickwork; bolt set horizontally, No. 163-F;
elevation 806.170."
The features which are shown on topographic maps
can be summarized as follows:
|
Type of map feature
|
Color Used
|
| 1. Relief - the hills and valleys
represented by contour lines |
brown
|
| 2. Water - all drainage, including
rivers, lakes, oceans, etc. |
blue
|
| 3. Culture - works of man, including roads, buildings, bridges,
political boundaries, etc. |
blblackk
|
| 4. Woodland -
coniferous
and deciduous trees |
green
|
| 5. Main Roads & Highways |
red
|
In addition to the map itself, additional information
can be found in the map margins, including the name of the map (usually
a prominent geographic feature), the scale of the map, the contour interval,
the position of the map in relation to other maps, and a reference table
of symbols used in the map. This marginal detail should be consulted
before any examination of the map is undertaken.
In the United States, the topographic maps are issued
by the U.S. Geological Survey, and are
compiled in the National Topographic Series. Topographic maps for
the whole of the U.S.A. have not as yet been made, but State Geologic Map
Indexes which show the areas already mapped are available from the U.S.
Geological Survey or the local state geological survey. (In Illinois, the
Illinois
State Geological Survey is located in Champaign/Urbana.) Information
on how to order topographic maps may be obtained from the U.S.
Geological Survey web site at the following address:
http://mapping.usgs.gov/mac/findmaps.html
Standard Map Orientation
By convention, all maps
are oriented in the following way: top is North, bottom is South;
right is East; and left is West. Thus, a certain locality on the
map is described not as "in the top-right corner,"
but "in the northeast corner."
The boundaries of a map are the parallels
of latitude, lines which run east-west and are measured north and
south of the equator; and the meridians of longitude, lines which
run north-south and are measured east and west of the Prime Meridian (which
runs through Greenwich, England). The degrees and minutes of
latitude and longitude are indicated at each corner of the map, with the
number located opposite its respective line. The degrees and minutes of
latitude and longitude are indicated at each corner, with the number located
opposite its respective line. It is important to note that the east-west
latitude
lines are always parallel, while the north-south longitude
lines converge at the north and south poles.
Types of Map Scales
The scale of a map gives
the relation between the actual size of the map and the size of the area
represented on the map. This is usually stated in two or three different
ways in the margin of the map:
-
Verbal Scale: a statement of the scale in the form of an equation,
such as "1 inch = 1 mile" - meaning that 1 inch on the map is equivalent
to one mile on the ground.
-
Graphic Scale: a bar, divided into sections, which corresponds to
specific distances in that area. This bar will often be divided into
4 or 5 equal sections, and one of these is divided into fractions of its
length. If the map is reduced or increased in size by photographic
process, the graphic line will still accurately indicate the scale of the
map. The distance between two point on the map may be readily determined
by marking off points on the edge of a piece of paper and measuring the
distance on the graphic scale.
-
Representative Fraction (R.F.): a fraction in which the numerator
(always assigned the number 1), denotes a unit of measure (inch, centimeter,
foot) on the map, and the denominator denotes the number of identical units
(same as the map) of actual distance on the map. In other words,
an R.F. is a ratio of MAP : LAND. Because identical units
are used for both map and land, any ONE unit may be used, but a mixture
of units CANNOT be used without changing the numerical relationship between
map and land.
For more details and examples, see "Map
Scales & Units"
Contour Lines & Relief
Changes in the shape of the earth's surface (topography)
may be represented by means of a relief map, which actually shows
hills and valleys. However, such maps have the disadvantage of being
large, cumbersome, and expensive. Because relief maps usually represent
a very large area, it is difficult to accurately show fine details.
Also, relief maps typically show a high degree of vertical exaggeration,
meaning that the vertical (elevation) scale is much larger than the horizontal
(distance scale), so that the mountains stand out.
Most maps are produced on flat sheets of paper, and
on topographic maps, the vertical dimension (elevation change) is
represented by a graphical device known as a contour, an imaginary
line connecting points of equal elevation above some reference elevation
(datum), or, put another way, a contour represents the intersection
of an imaginary horizontal plane with the land surface. The usual
reference elevation or datum is mean (average) sea level,
which represents a zero contour line. If the sea were to rise 20
feet, the new shore line would be a a level marked by the 20 foot contour.
This vertical distance between two adjacent contour lines is called the
contour
interval.
The contour interval chosen for a map
depends on the size of the area that the map will cover, and the differences
in elevation in the area. Large contour intervals, such as 100, 250,
or 500 feet, might be used for maps of a while province or in regions which
are mountainous. Small contour intervals, such as 1, 5, 10, or 25
feet, might be used for small areas such as the university campus, or the
prairie regions of western Canada, where there is little relief.
In order to facilitate map reading, only every 5th may be labeled or drawn
in bold. The standard color for contour lines is brown.
The elevation of prominent features such as hill
tops and road intersections is often indicated by a brown number on the
map. The elevation of any point not located on a contour line can
only be estimated (interpolated) by its relative position between adjacent
contours.
In contrast to a valley, a depression is completely
surrounded by ground which stands at a higher elevation than the bottom
of the depression. Depression contours which are used to represent
these hollows without outlets have small hachures ("teeth") on the contour
lines that point toward the lower elevation.
General Rules Applied To Contours:
-
All contour lines close together at some point, even though this may occur
off the map.
-
On a steep slope, contours are spaced close together, indicating a relatively
rapid change in elevation.
-
On a gentle slope, contours are far apart.
-
On perfectly level ground, there are theoretically no contours.
-
Contours never cross one another. However, contours of different
elevations may superimpose together at a vertical (at 90 degrees
to the horizontal) cliff wall.
-
Contours never split apart.
-
Where contours cross a stream valley, they must bend upstream in order
to remain at the same elevation (known as the "Rule of V's")
-
An isolated, closed contour has the same elevation as the adjacent higher
contour.
-
An isolated depression contour, marked by hachure lines pointing down slope,
has the same elevation as the adjacent lower contour.
Topographic Maps Exercises
Complete the questions which follow:
1.(a) Express the verbal scale "1 inch = 1 mile" as
an R.F.
1.(b) Express the verbal scale "1 foot - 2,000 yards"
as an R.F.
1.(c). Express the R.F. "1 : 250,000" as a verbal
scale.
1.(d) An area has been mapped at an R.F. of 1:50,000.
A new map of the same area is drawn at an R.F. of 1:25,000. What
area of paper, in relation to the first map, will be needed for the new
map?
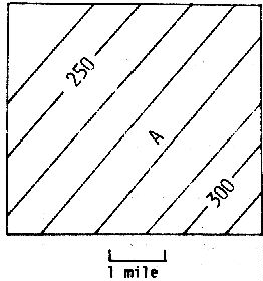
X
 Y Y |
2. The diagram at the left is a contoured map.
(a) Mark the positions of North, South, East, and West with appropriate
letters.
(b) Is the X boundary latitude or longitude?
(c) In which geographic direction does the stream flow? How do
you know?
(d) The gradient is defined as the vertical change in elevation (in
feet) per horizontal (map) distance (in miles). Calculate the stream's
gradient on this map, if the stream is 2 miles long, and the contour interval
is 10 feet. |
 |
3. (a) What is the contour interval (C.I.) of the map at the left?
(b) What is a approximate different in the elevation between the
highest and lowest points on this map?
(c) If you were standing at point "A" and wanted to walk downhill along
the maximum gradient or slope (or if you spilled a bucket of water from
point A), in which geographic direction is this?
(d) The graphic scale of this map (for 1 mile) is shown below the map
at the left. Calculate the distance from the northeast to the southwest
corner. |
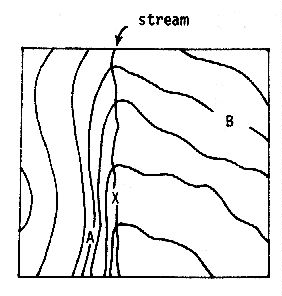 |
4. (a) In which geographic direction does the stream flow? How
do you know this?
4. (b) If you were standing at "X," would it be easier to walk due East
or due West? Justify your answer.
4. (c) If the distance "AX" is 2 miles, and the distance "BX" is 8 miles,
which is higher above X, A or B?
|
Land Office Grid Survey (Township
& Range) Coordinate System
In order to locate any feature on a map, some reference
system is required. Certainly this can be done using coordinates
of latitude and longitude, but this often becomes cumbersome. Accordingly,
an alternative system, the Land Office Grid Survey, is available in many
places.
The Land Office Grid Survey (also called the Township
& Range System) is set up using man-made reference lines called the
Principal Meridian (a "zero" line which runs north-to-south) and Principal
Base (running east-to-west) Lines. Townships are 6 mile increments
located in reference to the Principal Meridian, while ranges are 6 mile
increments located in reference to the Principal Base line (see Figure
1)
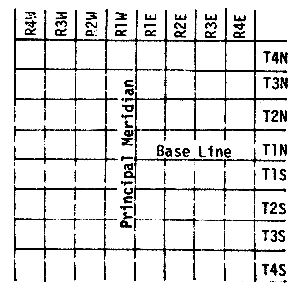
Figure 1
The intersections of the township and range lines
each define a square parcel of land called a township, which measures 6
miles north-to-south by 6 miles east-to-west, for a total area of 36 square
miles. Each township is composed of 36 sections, each of which measure
1 square mile. The numbering system of the sections is always the
same; section 1 is always located in the northeast corner of a township.
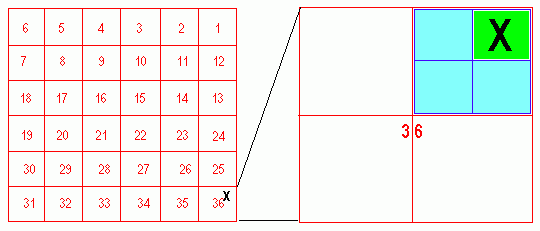
Figure 3
In order to locate a plat of ground within a section,
it is common to subdivide the section. To precisely locate a landmark
using the township and range system, the appropriate section may be subdivided
into 1/4 sections, one of which is subdivided into 1/4 mile squares (about
40 acres in area). Referring to Figure 3 above, an entire township
is shown in the left diagram, and an enlargement of Section
36 is shown at the right. To locate
the X shown above, the correct township and range coordinates should
read:
"NE 1/4 of the NE
1/4 of Section 36"
Note that Section 36
is subdivided in two steps: first into 1/4 sections (NE
1/4), then that 1/4 section is subdivided
once more (NE 1/4).
On the periphery of your topographic map, look for
the township and range designations. Commonly, these red boundary
lines will indicate one township/range coordinate on one side of the line,
and another coordinate on the other side. You can also detect a township/range
boundary line by looking for an abrupt change in the section numbering
system. For example, if you spot a "Section 1" on your map, and the
section immediately due north of it is labeled "Section 36," you should
recognize that there is a township boundary between those 2 sections.
The Land Office Grid System is just one of several
coordinate systems which are common included on maps. The military
services have their own system. Search the topographic map with which
you are working for any evidence of another coordinate system which may
be included.
For more details and practice exercises on using
the Township & Range coordinate system, see the handout, "Township
& Range."
 Figure 4
|
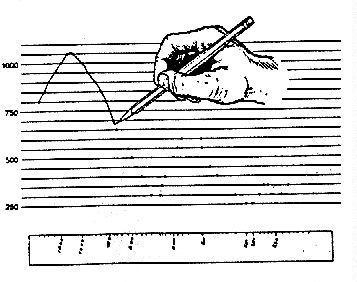 Figure 5
|
Constructing A Topographic Profile
Topographic maps represent
a view of the landscape as seen direction from above and give an excellent
perspective for regional relations. This view, however, is unnatural,
for we are accustomed to seeing hills and valleys from the side.
In detailed studies of landforms, it may be desirable to construct a profile
or cross section through certain critical areas, so that various features
may be analyzed from a more natural view. A profile
may be constructed quickly and accurately across any straight line on a
map, according to the procedure outlines below.
-
Lay a strip of paper along the profile line
where the profile is to be constructed (Figure 4).
-
Mark on the paper the exact place where each contour,
stream, and hilltop crosses the section line.
-
Label each mark to correspond with the elevation
of the contour it represents. If contour lines are closely spaced,
it is sufficient to label only the index contours.
-
Prepare a vertical scale on graph paper by labeling
horizontal lines corresponding to the elevation of each index contour line.
-
Place the paper with the labeled contour lines at
the bottom of the profile paper and project each contour to the horizontal
line of the same elevation.
-
Connect all points with a smooth line (Figure 5).
Obviously, the appearance of the
profile will vary depending on the spacing of the horizontal lines on the
graph paper. If the vertical scale is the same as the horizontal
scale, the profile, except on very small scale maps or in areas of extremely
rugged topography, will be nearly flat. Therefore, one generally
uses vertical exaggeration when drawing the profile to accentuate
local relief.
Gradients: One can easily
determine the gradient of a stream by measuring a representative section
of a stream and dividing this distance (in miles) into the vertical difference
(in feet) between the starting point and end point. The result is
an expression of a change in elevation in feet per mile (ft./mi.)
For an exercise on constructing a topographic profile
from a map, see the handout "Topographic
Profile Exercise."
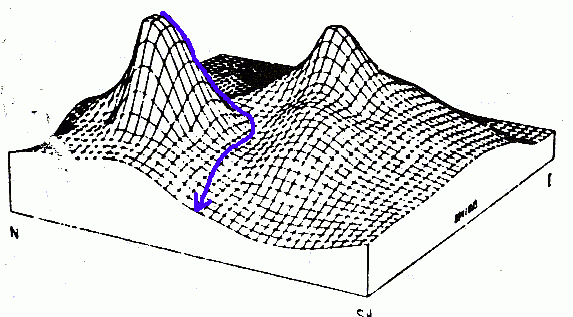
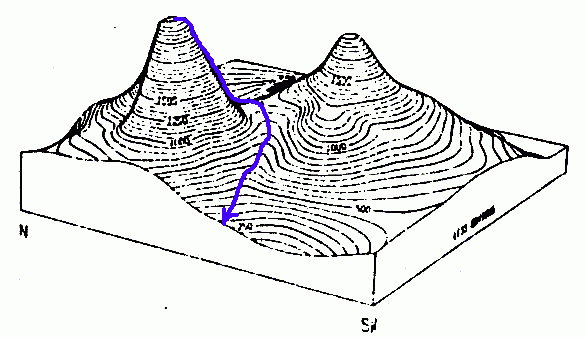
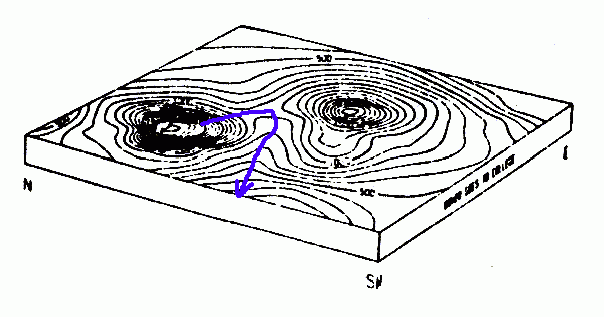
Visualizing Contours From a
3-Dimensional Land Form
For teaching purposes, topographic contours are best
visualized in a series of steps, from a simplified, idealized 3 dimensional
land form. The first diagram (Figure 6) shows a computer generated
surface depicting a hilly landform surface as a "fishnet." Figure
7 shows the same landform with contour lines. Figure 8 shows the
landform with the relief removed (flat surface), but with the contours
intact. Figure 9 shows the map view of the same surface.
|
|
| Figure 6: Water takes the steepest path down the side of the
hill into the valley |
Figure 7: Note how the water's downhill path falls into the contours
which bend upstream |
|
|
| Figure 8. Flattened surface with contours intact |
Figure 9. Topographic Map (aerial view) of same surface. |